The VisualScript Cookbook

5/20 Page

Creating Tables with VisualScript

Tables are a very powerful feature of VisualScript. They are used to subdivide a shape into multiple cells that have similar properties to a shape: labels, colors, hyperlinks, and more. A cell can also contain another shape. This can be the root shape of a whole "diagram": a tree, a flowchart, a ShapeContainer and even another table.

Adding a Table to a Shape

A table can be added for any shape using the AddTable() method.

var myTable=myShape.AddTable(NRows,NColumns);
      

The only required properties of a Table object are the number of rows and columns. This script creates a table inside a shape with three rows and one column, and three cells.

{
            myTable=myShape.AddTable(3,1);
            }
          
VisualScript table with three rows

This creates a table inside a shape with three columns and one row and three cells.

{
            myTable=myShape.AddTable(1,3);
            }
          
VisualScript three column table

This creates a table inside a shape with three columns and three rows and nine cells.

{
            myTable=myShape.AddTable(3,3);
            }
          
VisualScript nine cell table

Joining Rows or Columns

More complex arrangements can be achieved using the JoinAcross and JoinDown methods of a table. The method will take the StartingRow, StartingColumn and NumberofCells as parameter. When specificying which cells to join, note that the coordinates are 1-based.

{
            myTable.JoinAcross(1,1,1)
            }
          
VisualScript join table columns

To join cells, you'll have to define the anchor row and column and the number of cells to add to it.

You can also Join down in a column.

{
            myTable.JoinDown(1,1,2)
            }
          
VisualScript join table rows

You can define multiple joins in an array.

{
            myTable.JoinDown(1,1,2);
            myTable.JoinAcross(2,2,1)    
            }
          
VisualScript table array

Setting the Size of a Table

By default, a table is made to fit inside the shape that hosts it - with the caveats that a row cannot be smaller in height than is required for a line of text in the default font and the width of a column cannot be less than the width of a single character in the default font of the shape. Cells will grow to accommodate the text that they contain based on the TextGrow property of the host shape, but it is sometimes useful to be able to set the minimum width of a column and/or height of row for the whole table. In this example we set the height of all the rows to 50/100" and the width of all the columns to 1".

{
            var myTable=myShape.AddTable(3,3);
            myTable.SetRowHeight(50).SetColumnWidth(100).JoinDown(1,1,2);
            }
          
VisualScript larger table

Defining Cells

The intersection of a row and a column defines a cell. A cell has many of the properties of a shape. You can set Cell properties by first creating a Cell() object at the desired row and column, and then using its property setter methods.

{
            myTable.JoinDown(1,1,2);
            var myCell=myTable.AddCell(1,1);
            myCell.SetLabel("Lots of Text in cell 1");
            var myCell2=myTable.AddCell(2,2);
            myCell2.SetLabel("Text in cell 2");
            }
          
VisualScript text heavy cell

For each Cell object, the Row and Column coordinates are required to define the cell. Then each cell may have a label, colors, hyperlinks and even an image.

{
            myTable.JoinDown(1,1,2);
            var myCell=myTable.AddCell(1,1);
            myCell.SetLabel("Lots of Text in cell 1").SetFillColor("#FFCC66");
            var myCell2=myTable.AddCell(2,2);
            myCell2.SetImage("https://wcs.smartdraw.com/working-smarter/img/how-to-write-a-desktop-quality-cloud-app.png");
            }
          
VisualScript text heavy colored cell

Displaying Images in Cells

By default and image displayed in a cell fills it completely. The image is scaled so that the aspect ratio is preserved and no white space is seen either on the sides or top and bottom.

You can also display an image inside the text area of the cell. This is cell rectangle indented by the text margin for the shape.

{
            myTable.JoinDown(1,1,2);
            var myCell=myTable.AddCell(1,1);
            myCell.SetLabel("Lots of Text in cell 1")
            .SetFillColor("#00FFFF");
            var myCell2=myTable.AddCell(2,2);
            myCell2.SetImage("https://wcs.smartdraw.com/working-smarter/img/how-to-write-a-desktop-quality-cloud-app.png");
            myCell2.SetCellDisplayRectAsText(true);
            }
          
Image inside a cell

Defining Grid Lines and Other Row and Column Properties

The border of a cell is defined by the line for the row and column it is in. Properties that apply to whole rows and columns are set using the RowProperties and ColumnProperties objects.

You create these with the AddRowProperties(Row) and AddColumnProperties(Column) methods of a Table. The Row and Column index parameters are required.

RowProperties has settings for color and thickness of its bottom line.

{
                var myRowProperties=myTable.AddRowProperties(1);
                myRowProperties.SetLineThickness(0);
                }
              
Defining the borders of table rows and columns

You can remove all of the grid lines this way.

{
                var myRowProperties1=myTable.AddRowProperties(1);
                myRowProperties1.SetLineThickness(0);
                var myRowProperties2=myTable.AddRowProperties(2);
                myRowProperties2.SetLineThickness(0);
                var myColumnProperties1=myTable.AddColumnProperties(1);
                myColumnProperties1.SetLineThickness(0);
                var myColumnProperties2=myTable.AddColumnProperties(2);
                myColumnProperties2.SetLineThickness(0);
                }
              
VisualScript table with no borders

You can change the color of the lines too:

{
                var myRowProperties1=myTable.AddRowProperties(1);
                myRowProperties1.SetLineColor("#FF0000");
                var myRowProperties2=myTable.AddRowProperties(2);
                myRowProperties2.SetLineColor("#0000FF");
                var myColumnProperties1=myTable.AddColumnProperties(1);
                myColumnProperties1.SetLineThickness(5)
                .SetLineColor("#FFCC66");
                var myColumnProperties2=myTable.AddColumnProperties(2);
                myColumnProperties2.SetLineThickness(5).SetLineColor("#FFCC66");
                }
              
VisualScript table with multi colored lines

You can use RowProperties and ColumnProperties to define the minimum height and width of a row and column. "Height":"75" and "Width:"100" sets the row to 75/100 of an inch tall and width of a column to 1" wide.

{
                var myRowProperties1=myTable.AddRowProperties(1);
                myRowProperties1.SetLineColor("#FF0000");
                var myRowProperties2=myTable.AddRowProperties(2);
                myRowProperties2.SetLineColor("#0000FF").SetHeight(75);
                var myColumnProperties1=myTable.AddColumnProperties(1);
                myColumnProperties1.SetLineThickness(5).SetLineColor("#FFCC66").SetWidth(100);
                var myColumnProperties2=myTable.AddColumnProperties(2);
                myColumnProperties2.SetLineThickness(5).SetLineColor("#FFCC66");
                }
              
VisualScript table with tall cell

Finally, you can apply cell properties to an entire row or column using RowProperties and ColumnProperties. For example if I want to set the color of the first row of table to be white, while the rest remains blue (the default shape color):

{
                var myTable=theShape.AddTable(3,3);
                var RowProperties1=myTable.AddRowProperties(1);
                RowProperties1.SetFillColor("#FFFFFF");
                }
              
Color rows on table

RowProperties are applied before ColumnProperties so if the properties of a cell are changed by both the ColumnProperties setting will "win". Cells are processed last so any setting of property using a cell will override setting of the same property with RowProperties or ColumnProperties.


Alternating Row Colors

The "AlternateRows" property of a table makes the rows alternate between two colors:

{
                  myTable.SetAlternateRows();
                  }
                
VisualScript table with alternating row colors

The default colors are shown above. You can override the defaults:

{
                  myTable.SetAlternateRows("#FFCC66","#0000FF");
                  }
                
VisualScript change row colors

Alternating Column Colors

The AlternateColumns property of a table makes the columns alternate between two colors:

{
                  myTable.SetAlternateColumns();
                  }
                
VisualScript change row colors

The default colors are shown above.

You can override colors and set a range for the rows affected and which column to begin alternating.

{
              myTable=myTable.SetAlternateRows(color1,color2,StartRow,EndRow,StartCol,UseFirstRow);
              }
            

For example:

{
                  myTable=myTable.SetAlternateColumns("#FF8080","#80B8E0",2,4,2,false);
                  }
                
VisualScript change row colors

Note that UseFirstRow=true follows the column pattern of the first row of the table. This is used by Timelines.

Adding Shapes to Table Cells

You can add a shape to a table cell:

var myShape=myCell.AddShape();
            

{
                  var myCell1=myTable.AddCell(1,1);
                  myCell1.SetLabel("Cell 1");
                  var myCell2=myTable.AddCell(2,2);
                  var myInsideShape=myCell2.AddShape();
                  }
                
VisualScript shape within cell

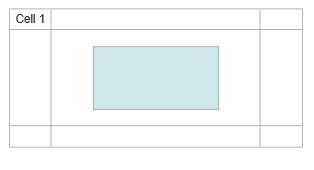
Note that cell 2,2 grows to accommodate a default-sized shape.

Positioning the Shape in a Cell

By default, the shape in the cell has a margin of 20/100" separating it from the edge of the cell. 
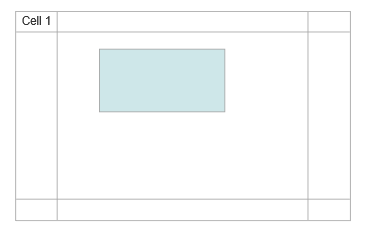
You can control this margin with two methods:
myTable.SetShapeMarginH(margin) and
myTable.SetShapeMarginV(margin)

{
              var myCell1=myTable.AddCell(1,1);
              myCell1.SetLabel("Cell 1");
              var myCell2=myTable.AddCell(2,2);
              myTable.SetShapeMarginH(50);
              var myInsideShape=myCell2.AddShape();
              }
            
Position a shape inside cell

If you make the cell larger than the shape plus margin it is placed according to the text justification in the cell.

{
              myTable.SetShapeMarginH(50);
              var column=myTable.AddColumnProperties(2);
              column.SetWidth(300);
              var row=myTable.AddRowProperties(2);
              row.SetHeight(200);
              var myCell1=myTable.AddCell(1,1);
              myCell1.SetLabel("Cell 1");
              var myCell2=myTable.AddCell(2,2);
              myCell2.SetTextAlignH("left");
              myCell2.SetTextAlignV("top");
              var myInsideShape=myCell2.AddShape();
              }
            
Margin around an image inside a cell

Placing Multiple Shapes in Cells

The shape may have all the properties of any shape, including being the root shape for a ShapeContainer, a ShapeConnector or another table:

{
                  var myCell1=myTable.AddCell(1,1);
                  myCell1.SetLabel("Cell 1");
                  var myCell2=myTable.AddCell(2,2);
                  var myInsideShape=myCell2.AddShape();
                  var myShapeContainer=myInsideShape.AddShapeContainer("Row");
                  var myInsideShape1=myShapeContainer.AddShape();
                  myInsideShape1.SetLabel("Choice A").SetFillColor("#FFFFFF");
                  var myInsideShape2=myShapeContainer.AddShape();
                  myInsideShape2.SetLabel("Choice B").SetFillColor("#FFFFFF");

                  }
                
VisualScript two shape table

Note you can "Hide" the parent shape of these two children and get the effect of adding multiple shapes to one cell.

{
                  var myCell1=myTable.AddCell(1,1);
                  myCell1.SetLabel("Cell 1");
                  var myCell2=myTable.AddCell(2,2);
                  var myInsideShape=myCell2.AddShape();
                  myInsideShape.Hide();
                  var myShapeContainer=myInsideShape.AddShapeContainer("Row");
                  var myInsideShape1=myShapeContainer.AddShape();
                  myInsideShape1.SetLabel("Choice A").SetFillColor("#FFFFFF");
                  var myInsideShape2=myShapeContainer.AddShape();
                  myInsideShape2.SetLabel("Choice B").SetFillColor("#FFFFFF");

                  }
                
VisualScript hidden parent table

Any ShapeConnector can be used too.

{
                  var myCell1=myTable.AddCell(1,1);
                  myCell1.SetLabel("Cell 1");
                  var myCell2=myTable.AddCell(2,2);
                  var myInsideShape=myCell2.AddShape();
                  var myShapeConnector=myInsideShape.AddShapeConnector("Decisiontree");
                  var myInsideShape1=myShapeConnector.AddShape();
                  myInsideShape1.SetLabel("Choice A");
                  var myInsideShape2=myShapeConnector.AddShape();
                  myInsideShape2.SetLabel("Choice B"); 
                  }
                
VisualScript nine cell table

A shape in a cell can contain another table which may also have a shape in a cell recursively:

{
                  var myCell1=myTable.AddCell(1,1);
                  myCell1.SetLabel("Cell 1");
                  var myCell2=myTable.AddCell(2,2);
                  var myInsideShape=myCell2.AddShape();
                  var myInsideTable=myInsideShape.Addtable(2,2);
                  var myInsideCell=myInsideTable.AddCell(1,1);
                  var myInsideInsideShape=myInsideCell.AddShape();
                  myInsideInsideShape.SetLabel("New Shape").SetFillColor("#00FFFF");
                  }
                
VisualScript colored nested table shape
5/20 Page
By continuing to use the website, you consent to the use of cookies.   Read More